

Shared Networks
Motivation
The question often arises of whether it is possible to share a network between two OpenStack projects. In this document, we will explain what is needed and how this can be implemented.
Share Network
If access to both projects is available:
In order to share the network, we needto use the OpenStackClient, the Project ID into which the network is to be shared, as well as the Network ID of the network to be shared.
The Project ID can be found in the output under “id” if we use the following command:
openstack project show <Name of Project> -f value -c id
Next, we need the Network ID of the network to be shared. We can find this in the output under “id” if the following command is used:
openstack network show <Name of Network> -f value -c id
With the obtained IDs, the network can now be shared into the corresponding project. To do this, we use Role-Based Access Control (RBAC):
openstack network rbac create --type network --action access_as_shared --target-project <ID of Project> <ID of Network to share>
If access to both projects is not available:
In this case, the network can only be shared by support after the approval of the other project owner.
To share a network with a project, please send us an e-mail to support@gec.io with the following information:
- Name and ID of the network to be shared
- Name and ID of the project in which the network should be visible
Important information about shared networks
When accessing a shared network, there are limitations that must be considered. One limitation is that no remote security groups can be used. Additionally, there is no insight into ports and IP addresses from the other project. Therefore, one can also specify any specific IP addresses for new ports in a subnet (in the shared network), as it would be possible to find IPs that are already in use.
In order to make use of the shared network, there is the option to create a new port. This then receives a random IP address to use, for example, to add a router through this port. This is not possible in the Horizon dashboard; we need to use the OpenStackClient.
Please ensure that no spaces or special characters are used in names, as using these can lead to problems.
First, we create the port and specify the shared network there:
openstack port create --network <ID of shared Networks> <Name of Ports>
Now, for example, a router can be created and then mapped to the newly created port:
##Creation of the router
$ openstack router create <Name of Router>

##Assigning a port to the router
$ openstack router add port <Name of Router> <Name of Port>
Network Topology Project 1
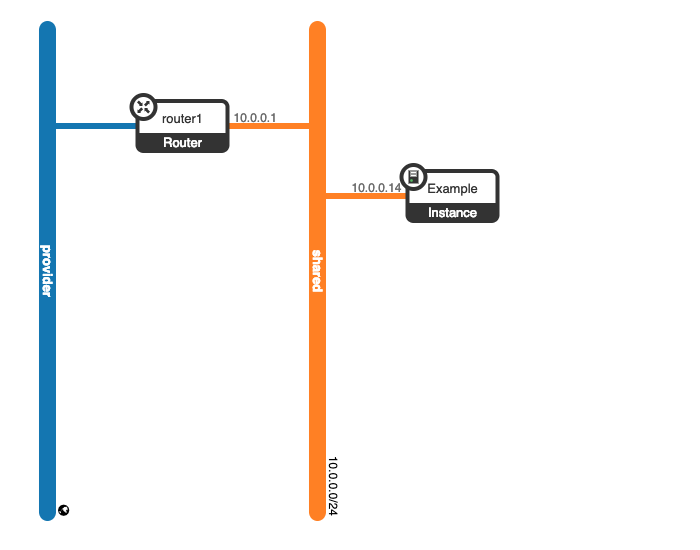
The network “shared” is shared from project 1 to project 2. The service “Example” is available in this network and runs on an instance there.
Network Topology Project 2
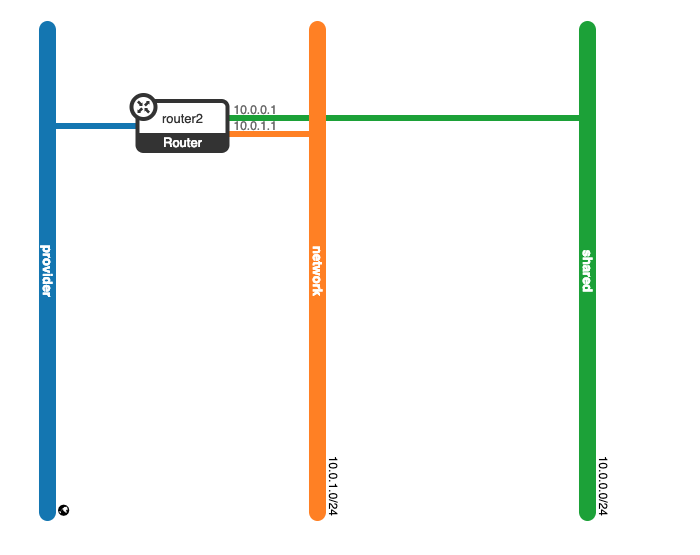
The network “shared” is also visible in project 2 and was attached to the router “router2”. In addition, we have the network “network” from which the services in the network “shared” should be accessed.
You have to make sure that the corresponding route is set in the subnet “host route” configuration of the “shared” network in project 1 in order to enable the correct return transport of the packets.
In our example the following route is required: 10.0.1.0/24,10.0.0.1